Tag: Visual edit |
Tag: Visual edit |
||
| (7 intermediate revisions by 3 users not shown) | |||
| Line 1: | Line 1: | ||
| + | == Control Guide == |
||
| ⚫ | |||
| + | RoboCo is a fairly complicated game and requires you to learn a series of basic commands. The most common commands are listed here. You can also find them by clicking the Hints button RoboCo's [[Getting Started|interface]]. |
||
| + | {| class="fandom-table" |
||
| + | |Rotate Camera |
||
| + | |Right Mouse Button |
||
| + | |- |
||
| + | |Zoom Camera |
||
| + | |Scroll Wheel |
||
| + | |- |
||
| + | |Move Camera |
||
| + | |[W][A][S][D] |
||
| + | |- |
||
| + | |Pan Camera |
||
| + | |Middle Mouse Button |
||
| + | |- |
||
| + | |Focus Camera |
||
| + | |[F] (with part selected) |
||
| + | |- |
||
| + | |Focus + Zoom Camera |
||
| + | |Double-tap [F] (with part selected) |
||
| + | |- |
||
| + | |Reset Camera |
||
| + | |[Home] |
||
| + | |- |
||
| + | |Remove Part |
||
| + | |[Control]+Left Mouse Button |
||
| + | |- |
||
| + | |Duplicate Part |
||
| + | |[Control]+[D] (with part selected) |
||
| + | |- |
||
| + | |Translate Tool |
||
| + | |Move parts in the environment or in the robot |
||
| + | |- |
||
| + | |Rotate Tool |
||
| + | |Rotate parts in the environment or in the robot |
||
| + | |- |
||
| + | |Change Joint |
||
| + | |Mouseover or Select Joints using [Q] and [E] to cycle through joint types and [Delete] to clear. |
||
| + | |- |
||
| + | |Remove Parts |
||
| + | |[Delete] (with part(s) selected) |
||
| + | |- |
||
| + | |Rotate Selection |
||
| + | |[Alt]+Left Mouse Button (with part(s) selected) |
||
| + | |- |
||
| + | |Rotate Snap |
||
| + | |[R] (while placing a part) |
||
| + | |- |
||
| + | |Place Duplicate |
||
| + | |[Shift] (while placing a part) |
||
| + | |- |
||
| + | |Multiselect |
||
| + | |[Shift] + Left Mouse Button |
||
| + | |- |
||
| + | |Select Connected |
||
| + | |Left Mouse Button (Double Click) |
||
| + | |- |
||
| + | |Box Select |
||
| + | |Click and drag to select multiple parts. Hold [Shift] to additively select. |
||
| + | |- |
||
| + | |Group Selected Parts |
||
| + | |[G] |
||
| + | |- |
||
| + | |Ungroup Selected Parts |
||
| + | |[U] |
||
| + | |- |
||
| + | |Undo |
||
| + | |[Control] + [Z] |
||
| + | |- |
||
| + | |Redo |
||
| + | |[Control] + [Y] |
||
| + | |- |
||
| + | |Hide UI |
||
| + | |[`] |
||
| + | |- |
||
| + | |Enter Active Mode |
||
| + | |[Space] |
||
| + | |- |
||
| + | |Robot Controls |
||
| ⚫ | |||
| + | [W] [A] [S] [D] [Q] [E] |
||
| ⚫ | |||
| + | |||
| ⚫ | |||
| + | Default Controls (Right Hand) |
||
| + | |||
| + | [I] [J] [K] [L] [U] [O] |
||
| + | |||
| + | (hold [L Shift] to move motors at half speed) |
||
| + | |- |
||
| + | |Switch Transmitters |
||
| + | |[1] [2] [3] … [8] [9] [0] |
||
| + | |} |
||
| ⚫ | |||
| + | =='''Default Robot Controls'''== |
||
| ⚫ | |||
{| class="article-table" |
{| class="article-table" |
||
|+ |
|+ |
||
| Line 17: | Line 108: | ||
<br /> |
<br /> |
||
| − | == '''Setting Custom Controls''' == |
+ | == '''Setting Custom Robot Controls''' == |
{| class="article-table" |
{| class="article-table" |
||
|+ |
|+ |
||
| Line 24: | Line 115: | ||
|- |
|- |
||
|Use this button to name your custom control scheme. |
|Use this button to name your custom control scheme. |
||
| − | |[[File:Setting Custom Controls - Step 1.png|alt=|none|thumb| |
+ | |[[File:Setting Custom Controls - Step 1.png|alt=|none|thumb|600x600px]] |
|- |
|- |
||
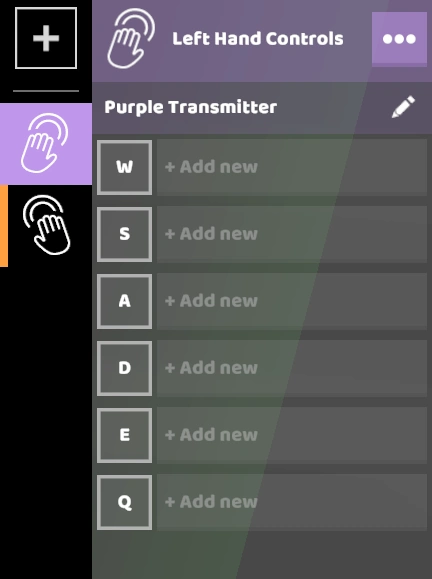
|To map a custom key to a part function, click Add New. |
|To map a custom key to a part function, click Add New. |
||
| − | |[[File:Setting Custom Controls - Step 2.png|alt=|none|thumb| |
+ | |[[File:Setting Custom Controls - Step 2.png|alt=|none|thumb|600x600px]] |
|- |
|- |
||
|First, select a part and the action you want that part to take. In this case, we’ve selected the DC motor and chosen Spin Forward as the action. |
|First, select a part and the action you want that part to take. In this case, we’ve selected the DC motor and chosen Spin Forward as the action. |
||
| − | |[[File: |
+ | |[[File:Setting Custom Controls - Step 3.png|alt=|none|thumb|600x600px]] |
|- |
|- |
||
|Clicking the Ellipses next to my new Action, you can now rename the action and map it to any key you want. |
|Clicking the Ellipses next to my new Action, you can now rename the action and map it to any key you want. |
||
| − | |[[File: |
+ | |[[File:Setting Custom Controls - Step 4.png|alt=|none|thumb|600x600px]] |
|} |
|} |
||
<br /> |
<br /> |
||
Latest revision as of 19:22, 14 October 2021
Control Guide[]
RoboCo is a fairly complicated game and requires you to learn a series of basic commands. The most common commands are listed here. You can also find them by clicking the Hints button RoboCo's interface.
| Rotate Camera | Right Mouse Button |
| Zoom Camera | Scroll Wheel |
| Move Camera | [W][A][S][D] |
| Pan Camera | Middle Mouse Button |
| Focus Camera | [F] (with part selected) |
| Focus + Zoom Camera | Double-tap [F] (with part selected) |
| Reset Camera | [Home] |
| Remove Part | [Control]+Left Mouse Button |
| Duplicate Part | [Control]+[D] (with part selected) |
| Translate Tool | Move parts in the environment or in the robot |
| Rotate Tool | Rotate parts in the environment or in the robot |
| Change Joint | Mouseover or Select Joints using [Q] and [E] to cycle through joint types and [Delete] to clear. |
| Remove Parts | [Delete] (with part(s) selected) |
| Rotate Selection | [Alt]+Left Mouse Button (with part(s) selected) |
| Rotate Snap | [R] (while placing a part) |
| Place Duplicate | [Shift] (while placing a part) |
| Multiselect | [Shift] + Left Mouse Button |
| Select Connected | Left Mouse Button (Double Click) |
| Box Select | Click and drag to select multiple parts. Hold [Shift] to additively select. |
| Group Selected Parts | [G] |
| Ungroup Selected Parts | [U] |
| Undo | [Control] + [Z] |
| Redo | [Control] + [Y] |
| Hide UI | [`] |
| Enter Active Mode | [Space] |
| Robot Controls | Default Controls (Left Hand)
[W] [A] [S] [D] [Q] [E] Default Controls (Right Hand) [I] [J] [K] [L] [U] [O] (hold [L Shift] to move motors at half speed) |
| Switch Transmitters | [1] [2] [3] … [8] [9] [0] |
Default Robot Controls[]
By default, RoboCo has pre-set robot controls for Left and Right hand. These controls can be edited to your preference.
| Left Hand | Right Hand |
|---|---|
 |
 |
| The Left Hand uses W, S, A, D, E, and Q | The Right Hand uses I, K, J, L, U, and O. |
Setting Custom Robot Controls[]


